How to Use Single-Point Alignment
Protractors
ere are
simple step-by step instructions that should cover most single-point and universal
alignment
devices.
Immobilize the
platter to stop its turning, using a small rubber wedge or a blob of Blu-Tack or similar,
if you haven’t done so already. Likewise, ensure that the bias adjustment is set to
zero.
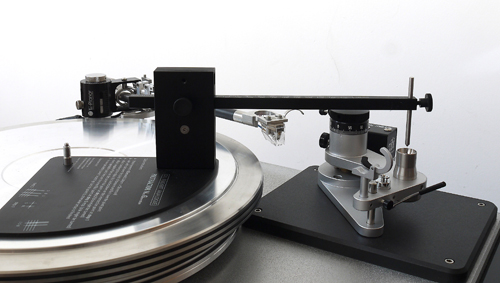
 Place the protractor over the spindle and align it with the tonearm mount/pivot
point. In the case of universal protractors using an extendable beam and adjustable pin
arrangement, ensure that the pin is placed directly over the pivot point. This might be
easier said than done. Place the protractor over the spindle and align it with the tonearm mount/pivot
point. In the case of universal protractors using an extendable beam and adjustable pin
arrangement, ensure that the pin is placed directly over the pivot point. This might be
easier said than done.
If the 'arm in question is a unipivot, removing the armwand (or placing the protractor
before installing the armwand) should reveal the tip of the bearing, allowing incredibly
precise alignment.
In the case of
gimbal-bearing 'arms (SME, Linn, Jelco, etc.) the pivot point is rather harder to fix.
Most universal/beam-type protractors offer a measurement scale on the beam itself. Set
this to the pivot-to-spindle (P2S) distance specified by your tonearm manufacturer --
normally found in the tonearm manual or instructions. Now use a ruler to fix the midpoint
across the gimbal housing. Where the two coincide should be the pivot point. It is worth
taking the time and trouble to get this spot on.
 Once
you have positioned the protractor, if it doesn’t incorporate its own fixing, it is
worth anchoring it in place to ensure that it does not move. Again, Blu-Tack is ideal for
this -- just don’t try and anchor the protractor to a separate platter mat as it will
be both messy and ineffective. Once
you have positioned the protractor, if it doesn’t incorporate its own fixing, it is
worth anchoring it in place to ensure that it does not move. Again, Blu-Tack is ideal for
this -- just don’t try and anchor the protractor to a separate platter mat as it will
be both messy and ineffective.
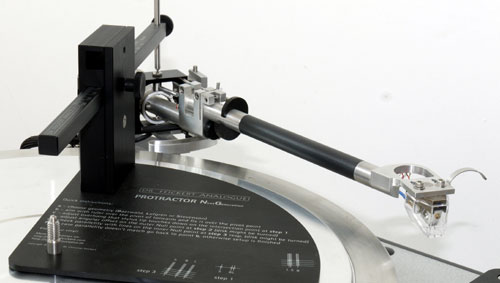
Now, gently place
the tonearm onto the protractor, with the stylus as close to the center of the grid as
possible. The first task is to set overhang (the tip-to-pivot distance). Lift the 'arm,
loosen the cartridge-mounting bolts until you can gently slide the cartridge in the
headshell and adjust its fore and aft position in the slots to allow the stylus tip to
fall precisely on the center point of the protractor grid, viewing the cartridge from the
side.
Some tonearms (such
as the SME) don’t have slots in the headshell, but use a rack and pinion to shift the
pivot position of the 'arm itself. The dedicated SME protractor takes this into account,
but if you don’t have access to a dedicated tool and your 'arm employs this system,
you will have to revise your initial setup of the P2S distance until the stylus lands on
the correct point.
 Either way, whether you are adjusting the armbase or sliding the cartridge in
slots, this will take you several attempts, so don’t give up until you have the
stylus dropping exactly on the cross/line. This is where really good lighting and
some magnification come in. It is also where the precision of your protractor has a
significant impact on the ease and accuracy of your adjustment. How thick the lines are
really matters, once you realize just how small your stylus really is. Either way, whether you are adjusting the armbase or sliding the cartridge in
slots, this will take you several attempts, so don’t give up until you have the
stylus dropping exactly on the cross/line. This is where really good lighting and
some magnification come in. It is also where the precision of your protractor has a
significant impact on the ease and accuracy of your adjustment. How thick the lines are
really matters, once you realize just how small your stylus really is.
Acoustical Systems
manufacture the sophisticated (and expensive) SMARTractor alignment device. Their chief
engineer, Dietrich Brakemeier, describes it thus: a 12” tonearm has an effective
length of around 300mm and supports a cartridge whose stylus contact patch with the groove
wall should be between 2 and 6 micrometers. That’s so tiny that it’s hard to
envisage, so let’s blow it up to real-world dimensions, 1000 times the size. Now, our
tonearm is 300 meters long (330 yards) while the cartridge, rather than 25mm long is now
2.5 meters or 8" in length -- the size of a compact car. What’s happened to size
of the contact patch between the stylus and the trench it is now running in? It’s
1000 times the size, making it anything up to 6mm long! That’s a 6mm contact patch
hanging on the end of a 300-meter beam. Suddenly the notion of precise alignment takes on
a whole new meaning."
In this context
simply being able to see what you are doing is way more than half the battle. A magnifying
glass is a good start, a freestanding photographic magnifier (loupe) is better and a USB
microscope is certainly effective, if expensive and somewhat fiddly to use -- worthwhile
if you set up a lot of cartridges, but otherwise a loupe probably offers the best value.
Whatever device you employ, it will quickly reveal the difference between having the
stylus tip roughly on the line and absolutely just so, the difficulty of making really
small, predictable adjustments. But don’t despair. It’s not difficult, just
tedious.
Once you have the
stylus positioned fore and aft, it is time to look at the angular alignment. This involves
viewing the cartridge from the front and ensuring that the cantilever sits exactly
parallel with the line of the grid (see images below). Adjustments involve twisting the
cartridge gently in the headshell, while trying to preserve the overhang setting. This is
difficult in practice, so once you have the cantilever aligned correctly, you need to go
back and check the overhang setting again. Keep going, using front and side views, until
both are correct.
With the
cartridge positioned correctly (see images below), now recheck and adjust the downforce.
With the correct tracking weight, recheck overhang and adjust if necessary (a significant
alteration in downforce can push the stylus tip forward slightly or drag it backward in
the groove).
Now, with a
representative record (of the type and weight you play the most) recheck the 'arm height.
Finally, set the
bias force. This counteracts the tendency of the curved groove wall to push the
cartridge toward the center of the record, thus keeping the cantilever centered above the
groove. The starting point for this is a value equal to the tracking force, although many
bias systems are uncalibrated, relying on magnetic forces, falling weight or
springs/dials. In either case, the way to check the setting is by watching the stylus
settle into the groove from the front. With the platter turning, use the cueing
device to drop the stylus halfway across the record. The cartridge should settle dead
straight, smoothly, without wobbling or lurching inward or outward. If it moves out,
increase the bias and vice versa if it moves in. If in doubt, tend towards lower bias
values as they generally sound better.
If all this sounds
like an endless round of set, check, set and check again -- that’s because it is.
Setting up a cartridge really isn’t difficult, especially if you make sure you have
all the tools and sufficient light before you start. What it is is repetitive and
painstaking. The more careful you are, the better the results and the better your record
player will sound.
|